Sunday, April 14, 2013

Sunday, March 31, 2013
Chem Blog Week 25
Over the weekend we were given the task to make an
electroscope. An electroscope is a device that is able to measure the amount of
charge an object has.
 When a charged body is brought near the metal knob, both
strips acquire a like. As a result, they repel each other and spread apart to
form an inverted V. Each dangling sheet of the foil will now have a charge, the
two dangling halves of the foil will now seek to repel each other as they have
the same charge. The electroscope is then charged. If an oppositely charged
body is brought close to the knob, the charge on the strips is neutralized, and
they again hang straight down. The strips of foil hang straight down when they
are not charged. The charge will transfer to the metal foil. The degree to
which the foil flattens itself out is a measure of the amount of charge on the
foil which shows the amount of charge on the original object.
When a charged body is brought near the metal knob, both
strips acquire a like. As a result, they repel each other and spread apart to
form an inverted V. Each dangling sheet of the foil will now have a charge, the
two dangling halves of the foil will now seek to repel each other as they have
the same charge. The electroscope is then charged. If an oppositely charged
body is brought close to the knob, the charge on the strips is neutralized, and
they again hang straight down. The strips of foil hang straight down when they
are not charged. The charge will transfer to the metal foil. The degree to
which the foil flattens itself out is a measure of the amount of charge on the
foil which shows the amount of charge on the original object.
How to Make it
 |
| An electroscope model closely replicated to my final product |
After going through different prototypes of electroscopes
this is the process I found to work best. Crumple a piece of foil into a ball.
Roll the smaller piece of foil between your palms to form a long, thin rod
shape. Now connect the foil ball to the end of the rod with a thin strip of
foil. Make a hole in the middle of the jar lid with a hole punch. Be sure that
the hole is large enough for the foil rod to fit through. Slide the rod through
the hole in the lid, so the ball sits above the lid, outside the jar, when the
top is screwed on. Bend the bottom of the rod so it makes a 90-degree angle.
The angle should resemble an uppercase L. Make a narrow strip of foil and fold
it in the middle. Fold up each end of the strip to make small flaps. Hang the
folded strip of foil on the end of the rod where you formed the L shape. The
strip should hang evenly on both sides. Screw the lid tightly on the jar, with
the foil rod and flaps inside.
How it Works
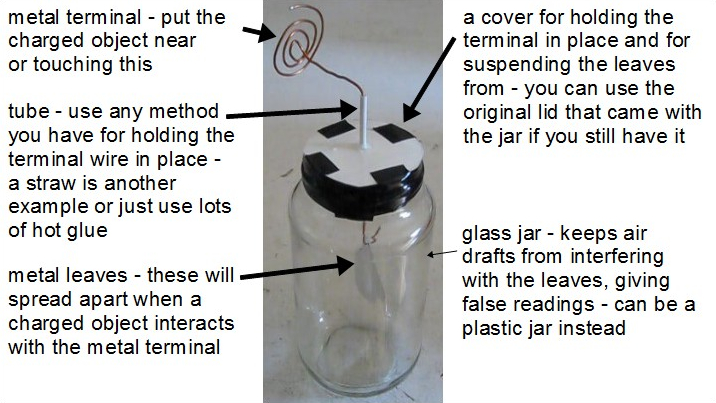 When a charged body is brought near the metal knob, both
strips acquire a like. As a result, they repel each other and spread apart to
form an inverted V. Each dangling sheet of the foil will now have a charge, the
two dangling halves of the foil will now seek to repel each other as they have
the same charge. The electroscope is then charged. If an oppositely charged
body is brought close to the knob, the charge on the strips is neutralized, and
they again hang straight down. The strips of foil hang straight down when they
are not charged. The charge will transfer to the metal foil. The degree to
which the foil flattens itself out is a measure of the amount of charge on the
foil which shows the amount of charge on the original object.
When a charged body is brought near the metal knob, both
strips acquire a like. As a result, they repel each other and spread apart to
form an inverted V. Each dangling sheet of the foil will now have a charge, the
two dangling halves of the foil will now seek to repel each other as they have
the same charge. The electroscope is then charged. If an oppositely charged
body is brought close to the knob, the charge on the strips is neutralized, and
they again hang straight down. The strips of foil hang straight down when they
are not charged. The charge will transfer to the metal foil. The degree to
which the foil flattens itself out is a measure of the amount of charge on the
foil which shows the amount of charge on the original object.
The day of the
testing went great. I thought my electroscope stopped working but it was just
because the object I was using was harder to charge than something like vinyl.
There were different types made but they were all mostly based off the same
idea. I did have some trouble actually making the electroscope. My original
idea using copper wire didn’t work out because I couldn’t find any copper wire,
and even the substitute of a wire hanger for the antennae did not give any
results. I did some more research and found the best model to get the best
results. This week was fun with our project and I hope that we have another
project soon!
Sunday, March 24, 2013
Chem Blog Week 24
This week, we learned more about charges and how they work
on a molecular basis. A positive charge is one with more positive ions than
negative ions. A negative charge is the opposite. And now we know what a
neutral charge is. A neutral charge is one with an equal number of positive and
negative ions.
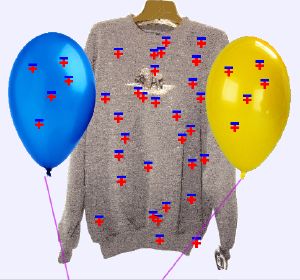
We were shown an experiment
including a sweater and a balloon on the SMART Board. The sweater and the
balloon initially didn't attract each other because they had neutral charges.
But, that changed when the balloon was rubbed against the wall, it became more
positive while the wall became negative. The negative ion moves. I then
wondered why the negative ions were moved rather than the positive ions. Did it
have to do with the greater electrostatic strength of positive ions than
negative ions? Or was it because the opposite charges of positive ions and
negative ions held each other in place? It seems as if though this is the case
because I think that the positive ions are stronger than the negative ions. It
seems as if though the negative ions have less strength because they have a
greater number of electrons than the positive ions. The reason I think this is
so is because I think that the less electrons there are, the less pressure is
being put on the "electro-chain" that holds the electrons in place. So
in summary the charge of positive ions is stronger than that of negative ions.
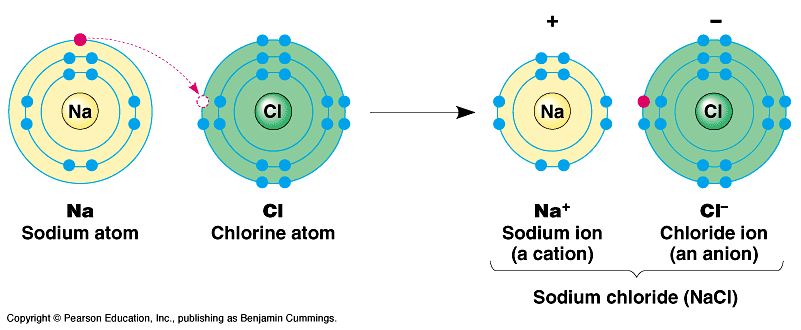
This same principle also applies to ionic compounds, which
form when ions transfer electrons to form neutral compounds. Through the
exchange of electrons one of the elements become positive while the other one
becomes negative. This is what happens when NaCl combine. The Na needed to lose
an electron while the Cl needed to gain one. So, through this "electron
exchange", the Na became positive and the Cl became negative. They then
formed an ionic compound, which means a neutral compound.
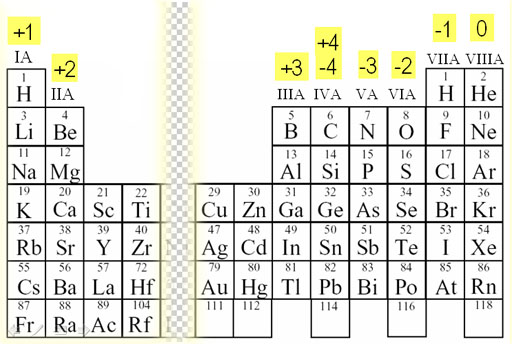 In order to find element’s charge you look at the periodic
table and based off what column that element is you will be able to know its
charge. This brought back a memory freshmen year in honors biology when our
teacher gave us a rhyme to help us remember the charge of elements: “+1, +2,+3,+4,
(transitional metals) -3,-2,-1, no more!” With this, I am easily able to find
charges for the elements.
In order to find element’s charge you look at the periodic
table and based off what column that element is you will be able to know its
charge. This brought back a memory freshmen year in honors biology when our
teacher gave us a rhyme to help us remember the charge of elements: “+1, +2,+3,+4,
(transitional metals) -3,-2,-1, no more!” With this, I am easily able to find
charges for the elements.
This week went pretty well. I believe I understand the concepts
we learned this week. I just need to practice with some of the equations with
the elements. We were also given the assignment to make an electroscope for Monday.
I’ve seen some videos on how to make one and it seems simple to make. But I
need to further understand how it actually works.
Sunday, March 17, 2013
Chem Blog Week 23
This week, I learned about atomic charges through a class
demonstration. When a classmate rubbed the pen on his shirt, he then held it up
to the match and the match moved–without any physical contact. I knew that the
reason was because charge but I did not know how charges work a particle level.
The first thing I learned was that a charge involves static electricity. We
found that this from the flow of Electrons. Electrons are the
smallest possible piece of an atom. This means that something is smaller than
the atom. The exchange of electrons allowed the pen to have moved the paper
clip without touching it. Because we now know that there is something smaller
than the atom we have to change the way we draw particle diagrams to represent
them at the smallest level. Particle diagrams in the past units could still be
drawn the same using dots to represent particles.
 Charges occur when the electrons transfer from one place to
another. Depending on the charges, they could charge with other things. This is
what I learned in the sticky tape lab. In this lab, we tested two pieces of
tape: one tape taped onto another tape. The objective was to test the top tape
and the bottom tape with other things to determine whether they would repel or
attract. The top tape that was ripped off the bottom tape seemed to attract to
the bottom tape. Next, the bottom tape was tested with the paper and the aluminum. The bottom tape attracted to the aluminum, but repelled the glass rod. Hence, the aluminum must be positive while the glass rod was negative. Through this example, I learned that opposite charges attract while the same charges repell
Charges occur when the electrons transfer from one place to
another. Depending on the charges, they could charge with other things. This is
what I learned in the sticky tape lab. In this lab, we tested two pieces of
tape: one tape taped onto another tape. The objective was to test the top tape
and the bottom tape with other things to determine whether they would repel or
attract. The top tape that was ripped off the bottom tape seemed to attract to
the bottom tape. Next, the bottom tape was tested with the paper and the aluminum. The bottom tape attracted to the aluminum, but repelled the glass rod. Hence, the aluminum must be positive while the glass rod was negative. Through this example, I learned that opposite charges attract while the same charges repell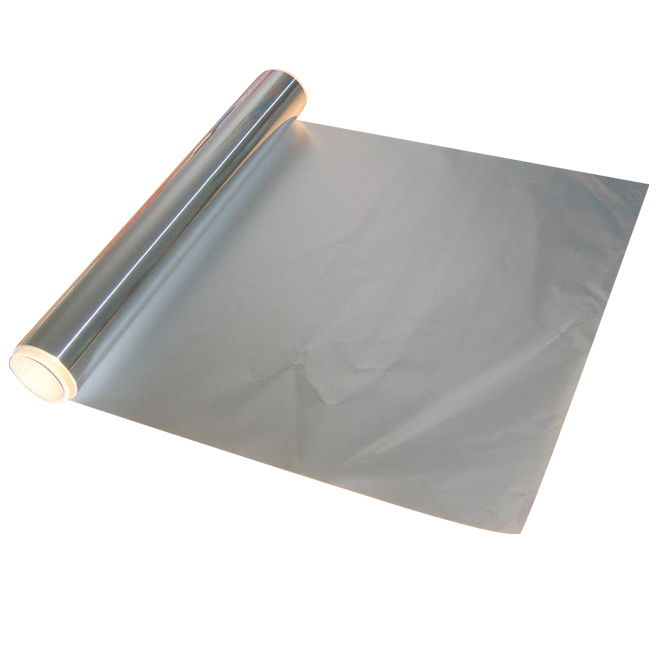
 We also tested the conductivity of certain materials, like brass,
silver, iron, zinc, copper, plastic, cardboard, and glass. The equipment we
used included two battery sets, wire clips, and a light bulb. We found all the
metal products were connected to the wires, the batteries, and the light bulb,
the light bulb lit because the electrons flowed through the wires to the light
bulb. The nonmetal products, however, did not conduct electricity because the
light bulb did not light up.
We also tested the conductivity of certain materials, like brass,
silver, iron, zinc, copper, plastic, cardboard, and glass. The equipment we
used included two battery sets, wire clips, and a light bulb. We found all the
metal products were connected to the wires, the batteries, and the light bulb,
the light bulb lit because the electrons flowed through the wires to the light
bulb. The nonmetal products, however, did not conduct electricity because the
light bulb did not light up.
Like I said in my last blog, this week was full of new
things! I understand everything and it was easy to learn. We even had 3
experiments this week! I don’t know how next week will top it!
Sunday, March 10, 2013
Chem Blog Week 22
 This week, I learned more about the complexities of finding
the number of moles. Also this week we had the MME/ACT testing so I was not in
class for most of the week so this blog will be a short one. We practiced more
with mole calculations and the concept and the mole but I am still a little
shaky with how to find the number of particles or the number of moles or the
mass. It probably showed on the
assessment we took online. I can describe what the mole represents and how it
works in writing but the calculations mess me up. I am also able to find molar
mass with the periodic table. This both connects with the electrolysis lab from
last week and the things we learned earlier. Hopefully I will be ready before
the reassessment because I tutor in chemistry and if I don’t have a grasp on
the concept, neither will the person I tutor. I will ask my friends for some help about it.
This week, I learned more about the complexities of finding
the number of moles. Also this week we had the MME/ACT testing so I was not in
class for most of the week so this blog will be a short one. We practiced more
with mole calculations and the concept and the mole but I am still a little
shaky with how to find the number of particles or the number of moles or the
mass. It probably showed on the
assessment we took online. I can describe what the mole represents and how it
works in writing but the calculations mess me up. I am also able to find molar
mass with the periodic table. This both connects with the electrolysis lab from
last week and the things we learned earlier. Hopefully I will be ready before
the reassessment because I tutor in chemistry and if I don’t have a grasp on
the concept, neither will the person I tutor. I will ask my friends for some help about it. Because this week was the ACT’s I will talk more about that
than anything. I felt as if I was too calm compared to other people but I feel
I did alright overall. I struggled on the science but I saw comfort that others
also had some trouble with that subject as well. Even though my strongest
subject is science. But it’s not really about your knowledge of science but
your ability to understand graphs and charts and given information that was
given. I’ll try to find something that would help me improve my test taking
strategies. The other tests went well and the test went by quickly but when it
was over I was exhausted!
Because this week was the ACT’s I will talk more about that
than anything. I felt as if I was too calm compared to other people but I feel
I did alright overall. I struggled on the science but I saw comfort that others
also had some trouble with that subject as well. Even though my strongest
subject is science. But it’s not really about your knowledge of science but
your ability to understand graphs and charts and given information that was
given. I’ll try to find something that would help me improve my test taking
strategies. The other tests went well and the test went by quickly but when it
was over I was exhausted!
Next week I am guessing that since we did not get to do much
this week next week will be twice as busy. But I am okay it!
Sunday, March 3, 2013
Chem Blog Week 21
This week in chemistry we learned the connection between molar mass and density that if you know molar mass you are able to determine the density of the the element. In the case of our electrolysis experiment, hydrogen and oxygen. |

This week, my group and I did an electrolysis experiment. I was so excited because ever since we saw the process of electrolysis on the SMARTBoard I wanted to try it out for myself. We had to hook up two probes to two metals ends at the bottom of the trough. We had to fill the trough with sodium chloride water solution. But, why not water? This is the part I felt I wasn't so sure of, but I think it had to do with the fact that sodium chloride could conduct electricity in order for the hydrogen and oxygen particles to chemically split from each other.
Then we use two graduated cylinders (one for hydrogen and the other for oxygen) and put them on top of the metal ends making sure that they are still full. This was a little hard but we were able to do so in a few attempts .This reminded me of the experiment a while ago with the trough but I think this was a bit simpler because instead we had to scoop the tubes with the solution and slowly tilt them to the bottom of the trough, then tilt it again toward the metal end and cover it with the tube without going over the top of the tube. It felt like doing brain surgery with the amount of caution to flip over a test tube!

Then, after that ordeal was over with, we then cranked the machine and repeatedly turned the handle clockwise. We then kept track of the volumes for each of the tubes filled with the hydrogen and oxygen. Every time we recorded the data, there was twice as much volume of the hydrogen as there was oxygen.
We ended up finding out that compared to hydrogen oxygen is much denser even though hydrogen has twice as much volume. This adds up because we now know that the molar mass of oxygen is 16 g/mol and that hydrogen is only 1 g/mol.
This week was very fun because we did a group lab and that is one of my favorite aspects of chemistry and science in general: the experiments! With this experiment I was able to get a greater grasp of molar mass and of the fixed ratio of compounds. Feel confident with the concepts of this week hopefully I do this well next week. I am not sure what is to come next week but I trust that I won’t be disappointed with what I learn next!
Sunday, February 17, 2013
Chem Blog Week 20
 This week, we learned about the mole and it’s used in
chemistry. In class, I did an experiment with my group. The goal was to compare
the mass of 1 item to all the rest. The items were an empty bottle, small brown
nails, hexnuts, pennies, screws, washers, bolts, and panel nails. To do the
experiment, the first item we measured the mass of was the empty bottle. We
found out it was 9.5g, and since all the elements had to stay in bottles, we
subtracted 9.5g from all the rest of the total masses to find the masses of the
small brown nails, hexnuts, pennies, screws, washers, bolts, and panel nails.
This week, we learned about the mole and it’s used in
chemistry. In class, I did an experiment with my group. The goal was to compare
the mass of 1 item to all the rest. The items were an empty bottle, small brown
nails, hexnuts, pennies, screws, washers, bolts, and panel nails. To do the
experiment, the first item we measured the mass of was the empty bottle. We
found out it was 9.5g, and since all the elements had to stay in bottles, we
subtracted 9.5g from all the rest of the total masses to find the masses of the
small brown nails, hexnuts, pennies, screws, washers, bolts, and panel nails.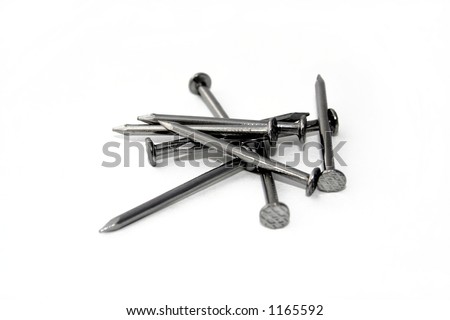
We had to choose one item to compare to all the other
objects. Since the small brown nails had the least mass, we decided to compare
it to the other items, and we found the ratios of their masses to the small
brown nails. The picture above shows the data. The small brown nails had a mass
of 1.3g, the hexnuts 18.9g, the pennies 11g, the screws 10g the washers 23.6g,
the bolts 7.1g, and the panel nails 4g. The small nails to hexnuts were 1 to
14.5, small nails to panel nails were 1 to 5.46, the small nails to pennies
were 1 to 8.3, the small nails to washers were 1 to 18.15, the small nails to
screws were 1 to 7.69, and the small nails to bolts were 1 to 5.46. Therefore,
I have concluded that small nails were the smallest, and the washers have the
largest mass since the ratio between small nails and washers was the greatest.
I still felt unsure, though, on particles and how to count them. How can I represent them in a group? This question was then answered as I learned in class that for every mole, there are 6*10^23 particles. Thus, the word mole is the collective group of particles.
I still felt unsure, though, on particles and how to count them. How can I represent them in a group? This question was then answered as I learned in class that for every mole, there are 6*10^23 particles. Thus, the word mole is the collective group of particles.

We found out that like this lab, this was how scientists found the atomic masses of the elements. They compared it to hydrogen, which has the smallest atomic mass, to all the rest. Also, the overall concept I learned from this was that there can be some way of calling 6 pieces of hardware to 1 collective group (e.g. 1 dozen=12 items). 1 dozen would be the collective group. So, we came up with a collective group name for the 6 hardware pieces: the Quinn. Therefore, proportionally speaking, for every Quinn, there are 6 hardware pieces and vice versa.
With this information we are able to plug in information like
an algebraic equation and easily find an answer!
Overall this week feel okay with what I learned. I
understand the concept, however, I am having a little trouble with the
calculating of moles. I should be able to understand it with some practice.
Sunday, February 10, 2013
Chem Blog Week 19


This week, our studies were mostly based off the following experiment of chemically mixing zinc and hydrogen chloride and finding its product and its volume so I wanted to describe the process of what we did thoroughly for full understanding.
In the experiment we used a known procedure to find the volume and type of the reactant. We were told to fill a bottle all the way with water while filling the trough with water. Then, mix the zinc and the hydrogen chloride together. But, we had to seal the beaker quickly so that the gas wouldn't escape. The gas goes through an opening inside the trough by a tube connecting the two. So, to collect the product, you should fill a bottle with water and tip it over right side using a lens to prevent spilling while removing the lens afterward. (I have become a pro at this art!) Then, combine the zinc and hydrogen chloride to react. When the glass bottle once filled with water is now full with gas we used the lens again to remove the bottle.
 Now, with the gas in the bottle, my group and I can test its
chemical properties to determine what the gas is. We previously learned that
Hydrogen is flammable and oxygen is combustible. To determine if the gas had
these properties, we lit a match to test for combustibility and flammability.
Once we put the match in the container, the flame got brighter. Therefore, the
gas was flammable. When the match got in contact with the gas, a popping sound
was made. Therefore, the gas was combustible. We also had to find the density
of the gas to help determine what it is. Subtract the mass of the beaker from
the total mass. Then, find the volume of the gas by looking at the bottle. If
there is any water in the bottle, this shows the amount of space it takes up.
Then, you divide the mass of the reactant by the volume in which it took up the
bottle to find the density.
Now, with the gas in the bottle, my group and I can test its
chemical properties to determine what the gas is. We previously learned that
Hydrogen is flammable and oxygen is combustible. To determine if the gas had
these properties, we lit a match to test for combustibility and flammability.
Once we put the match in the container, the flame got brighter. Therefore, the
gas was flammable. When the match got in contact with the gas, a popping sound
was made. Therefore, the gas was combustible. We also had to find the density
of the gas to help determine what it is. Subtract the mass of the beaker from
the total mass. Then, find the volume of the gas by looking at the bottle. If
there is any water in the bottle, this shows the amount of space it takes up.
Then, you divide the mass of the reactant by the volume in which it took up the
bottle to find the density.
To measure the zinc, we just put it on a measuring scale to
calculate its mass. Then, to find out the mass of hydrogen chloride, I figured
that in order to do so, we must find out the change in mass when comparing the
beaker's mass to the mass of the beaker and the hydrogen chloride in it. Then,
I subtracted the mass of the beaker with the total mass, therefore, to find the
mass of hydrogen chloride.
By finding the masses of all these variables, we figured this would be the best way to find out the total mass after the zinc and the hydrogen chloride are chemically combined together is by adding the masses of hydrogen chloride and zinc before they were combined. I assumed that since hydrogen or chlorine would escape from the system, the mass would have to decrease. With these results, we concluded that since the gas was combustible and flammable, it had both oxygen and hydrogen. But we asked the question “Where did the zinc and the chloride go?” And how did the oxygen get into the bottle? We conclude that since the air has oxygen, and since it is diatomic, it combined with hydrogen to form water. It makes sense because the bottle had condensation in it.
By finding the masses of all these variables, we figured this would be the best way to find out the total mass after the zinc and the hydrogen chloride are chemically combined together is by adding the masses of hydrogen chloride and zinc before they were combined. I assumed that since hydrogen or chlorine would escape from the system, the mass would have to decrease. With these results, we concluded that since the gas was combustible and flammable, it had both oxygen and hydrogen. But we asked the question “Where did the zinc and the chloride go?” And how did the oxygen get into the bottle? We conclude that since the air has oxygen, and since it is diatomic, it combined with hydrogen to form water. It makes sense because the bottle had condensation in it.
With this experiment it should be easy to understand the
lessons ahead and I am very excited about it!
Sunday, February 3, 2013
Chem Blog Week 18

This week, We learned about the concepts of Dalton's theory.
 On Monday, our class did a simulation on Dalton's theory in
the computer game. The first part of the game (Priestley) consisted of burning calx. As 7.39g of the
100g calx was burned, only 92.61g remained. We then had to use 200g of calx. With
conservation of mass it would be understandable that the mass would be two
times as much than the product from the first trial. The change in mass was
14.78g from the 200g calx. Therefore, depending on the mass of a substance
burning, it loses mass at a proportional rate. We also had to find the volume
of gas produced after burning the calx. I noticed that more mass was burned,
the more volume the calx would be surrounded in. Using the 100g, the volume of
gas came out to be 5.171L, and then using the 200g, the volume of gas came out
to be 10.34L. So since there is only half of the mass of calx left, the volume
doubled. Also, the volume of gas changed at a proportional rate to the rate at
which the mass of calx changed. With this simulation, we learn that all chemical
reactions occur in a fixed ratio.
On Monday, our class did a simulation on Dalton's theory in
the computer game. The first part of the game (Priestley) consisted of burning calx. As 7.39g of the
100g calx was burned, only 92.61g remained. We then had to use 200g of calx. With
conservation of mass it would be understandable that the mass would be two
times as much than the product from the first trial. The change in mass was
14.78g from the 200g calx. Therefore, depending on the mass of a substance
burning, it loses mass at a proportional rate. We also had to find the volume
of gas produced after burning the calx. I noticed that more mass was burned,
the more volume the calx would be surrounded in. Using the 100g, the volume of
gas came out to be 5.171L, and then using the 200g, the volume of gas came out
to be 10.34L. So since there is only half of the mass of calx left, the volume
doubled. Also, the volume of gas changed at a proportional rate to the rate at
which the mass of calx changed. With this simulation, we learn that all chemical
reactions occur in a fixed ratio.  The next experiment was the Lavoisier portion. This is where
the phlogiston and the oxygen were tested at burned at different rates to see
how they would change in mass or volume. First, 1/3 of the phlogiston was
burned. To begin with, both started out with volumes of 6L and they were both
in separate beakers , which had tubes connecting to a center beaker, which is
where the gas would go. As the oxygen and phlogiston burned, 5L for both were
left. Next, as 2/3 of the phlogiston were burned, 4 L for both oxygen and
phlogiston were left. But then, when all the phlogiston was burned, only half
of the phlogiston was used up so that 3L of oxygen were left. This would mean
that the phlogiston burned quicker, two times to be exact. We were then later
told that they renamed phlogiston to hydrogen simply meaning “water maker”.
The next experiment was the Lavoisier portion. This is where
the phlogiston and the oxygen were tested at burned at different rates to see
how they would change in mass or volume. First, 1/3 of the phlogiston was
burned. To begin with, both started out with volumes of 6L and they were both
in separate beakers , which had tubes connecting to a center beaker, which is
where the gas would go. As the oxygen and phlogiston burned, 5L for both were
left. Next, as 2/3 of the phlogiston were burned, 4 L for both oxygen and
phlogiston were left. But then, when all the phlogiston was burned, only half
of the phlogiston was used up so that 3L of oxygen were left. This would mean
that the phlogiston burned quicker, two times to be exact. We were then later
told that they renamed phlogiston to hydrogen simply meaning “water maker”. Lastly, we worked on the Diamond and Charcoal lab. We started
out with 0.20g of charcoal and diamond and kept the mass of oxygen at 1.06g and
volume at 0.74L constant (charcoal and diamond were tested individually). The
mass of the oxygen decreased from 1.06g to 0.73g as the subtracted amount went
to the 0.20g of charcoal, thus increasing the mass of charcoal to 0.53g. Next,
0.40g of charcoal was tested with the same volume of gas (0.74L). Then, the
mass of gas decreased from 1.06g to 0g and the volume dropped from 0.74L to 0L.
Therefore, with twice the mass, the rate at which volume dropped doubled, hence
the rate at which charcoal's mass increased. It was interesting to see that while
charcoal and diamond look so different, they do still share chemical
properties. I learned that they were related because of Jimmy Neutron! In
conclusion, when something is taken away it is always somewhere else due to it
being in a closed system and that chemical reactions occur at a fixed ratio.
Lastly, we worked on the Diamond and Charcoal lab. We started
out with 0.20g of charcoal and diamond and kept the mass of oxygen at 1.06g and
volume at 0.74L constant (charcoal and diamond were tested individually). The
mass of the oxygen decreased from 1.06g to 0.73g as the subtracted amount went
to the 0.20g of charcoal, thus increasing the mass of charcoal to 0.53g. Next,
0.40g of charcoal was tested with the same volume of gas (0.74L). Then, the
mass of gas decreased from 1.06g to 0g and the volume dropped from 0.74L to 0L.
Therefore, with twice the mass, the rate at which volume dropped doubled, hence
the rate at which charcoal's mass increased. It was interesting to see that while
charcoal and diamond look so different, they do still share chemical
properties. I learned that they were related because of Jimmy Neutron! In
conclusion, when something is taken away it is always somewhere else due to it
being in a closed system and that chemical reactions occur at a fixed ratio.
We later on in the week focused on the things we learned in
class on Monday and we had an assessment on Friday. I am not sure how I did,
but I know I struggled in some areas that I missed that week.
Sunday, January 27, 2013
Chem Blog Week 16/17

|
When I came back to
school the class was talking about mixtures, compounds, and elements, how
they were different and how they relate to each other. While I was behind a
week I had some understanding of the concepts. When I was sick, I checked up
on Google Drive an experiment the rest of the class did last week. It
involved having to separate different materials from each other using
different tactics of removal. The mixture of these materials is just that a
mixture: a group of matter that is physically combined. While a compound
is chemically combined. I also
found a worksheet that they did in class. It had particle diagrams that had
different looking figures in each box. One showed one element combined to a
different element and then another one with a different element but not
combined. The top picture showed two elements in a substance not chemically
bonded. I found out this is a mixture because the elements have still
retained their physical properties, and as a result, they haven't changed. The
bottom picture showed two different elements chemically combined together.
Therefore, this is a compound because their properties have changed as they
have formed a new substance.
 This week we did
another separation but it was the separation of a compound: Pepsi. Mr. Abud
told us to break up into teams so we could plan out and find information that
would contribute to the process of separation. My table along with another
tables did research on the ingredients of Pepsi which include high fructose
corn syrup, sugar, dyes, and of course water. When we found out the
ingredients the other groups were working on the distillation of the compound.
When this was done we were asked to find the volume of the water. Because we distilled the water all we had to
do was measure it. But I still
questioned if we got all of the water because ingredients left still looked
watery because I would think that what was left behind would have been a
darker and thicker substance. But we ran out of time in class to find out if
I was right. This week we did
another separation but it was the separation of a compound: Pepsi. Mr. Abud
told us to break up into teams so we could plan out and find information that
would contribute to the process of separation. My table along with another
tables did research on the ingredients of Pepsi which include high fructose
corn syrup, sugar, dyes, and of course water. When we found out the
ingredients the other groups were working on the distillation of the compound.
When this was done we were asked to find the volume of the water. Because we distilled the water all we had to
do was measure it. But I still
questioned if we got all of the water because ingredients left still looked
watery because I would think that what was left behind would have been a
darker and thicker substance. But we ran out of time in class to find out if
I was right.
While I was gone a week I
was able to catch up with the class pretty quickly. I felt like I was talking
and answering questions more than a lot of
the kids in class were. When I
came back I was also able to help my friends on past subjects and then they
helped me on what I missed. However , I am still slightly behind on some of the
things they studied while I was gone. Hopefully this does effect on how I do on
the midterm. But thanks to Google drive I am not too behind.
|
Monday, January 7, 2013
Chem Blog Week 15
This week I along with my group formed a
soap company with our self- made soap!
The next day they were ready to take the
soaps out of their molds and put them into their packages. We then later on had
to show our presentations to the class. Our presentation had a good layout,
great explanation, and an awesome logo edited by yours truly! We were able to answer
all of the questions given by Mr. Abud thoroughly.
I had a lot of fun with this project because
I was able to practice my team work skills. I am the type of person who likes to
work alone because I have had experiences with people not doing their part in
the assignment. But also working by myself I do not have debate with decisions
that need to be made. However, this project went fine teamwork wise but I wish
we were more prepared and connected but overall it was great!
Sunday, January 6, 2013
Chem Blog Week 14
 This week, we learned more about energy, particle arrangement
and particle motion.
This week, we learned more about energy, particle arrangement
and particle motion.I also learned about Heat of Vaporization and Heat of Fusion. Heat of Vaporization is the amount of energy that is required to convert a unit mass of a liquid into the vapor without a change in temperature. Heat of Vaporization occurs in state changes of liquid to gas and vice versa: (Vaporization) or (Condensation). Heat of Fusion is the amount of energy that is required to convert a unit mass of a solid into the liquid without a change in temperature. Heat of Fusion occurs in state changes of solid to liquid and vice versa: (Melting) or (Freezing).
 We spoke more about solid, liquid and gas. We used water the
most as an example. The states of water are very different not only because of
their physical states but because of the attraction of their particles. Solid
has stronger attraction between particles because the particles in a solid have
the least amount of energy so the particles are closer together. It’s like a
spring being pulled apart. It takes more energy to hold on to the ends of the
spring when the spring is stretched. The same thing applies with the movement
of particles. In a solid, particles have
strong attractions and move the least because there isn't enough energy to
change the arrangement of particles. In a gas, the particles barely bump into
each because they are farthest apart. The particles in a gas have the most
amount of energy because it takes a higher amount of energy to separate the
particles and make them move faster.
We spoke more about solid, liquid and gas. We used water the
most as an example. The states of water are very different not only because of
their physical states but because of the attraction of their particles. Solid
has stronger attraction between particles because the particles in a solid have
the least amount of energy so the particles are closer together. It’s like a
spring being pulled apart. It takes more energy to hold on to the ends of the
spring when the spring is stretched. The same thing applies with the movement
of particles. In a solid, particles have
strong attractions and move the least because there isn't enough energy to
change the arrangement of particles. In a gas, the particles barely bump into
each because they are farthest apart. The particles in a gas have the most
amount of energy because it takes a higher amount of energy to separate the
particles and make them move faster.
When physical states of substances change, this is because the attractions between the particles must be overcome in a solid to change to a liquid or gas (Eph). Just because the arrangement of particles changes, it doesn't mean that the motion of particles has changed. They could still move at the same rate (Eth). This is what Mr. Abud was saying about water on the T-shirt if it evaporated. The state of the water changed from liquid to gas, but the temperature of the water couldn't have change because if it were at the boiling point (100ºC), it would be pretty noticeable to the person wearing the shirt! While the Eth did not increase the Eph did because the water turned from a liquid to a gas.
Therefore, a solid has the most orderly arrangement of particles and the lowest amount of energy as well as motion of particles. The liquid has the second most fluid arrangement of particles, meaning they move freely about but not as rapidly as gas particles. Thus, liquid is more structured than a gas and has less energy. Gas has the most amount of energy with the particles being the farthest apart with the least attraction. Thus, the distance between the particles and the attraction between them has an inverse relationship much like volume and density.
Chem Blog Week 13
This week, I learned about energy transfer through the three
states of matter, and I learned about ETh and EPh.

We also did an experiment to find the specific heat of
copper. This week, my group and I had to come up with a procedure before we
started. First, we had to measure the mass of the copper, then the water's
mass, then, the temperature change of copper after putting it in water and the
temperature change of water . This also included us to find the original temperature
by looking at a graph of different metal colors depending on their temperature.
Then, I set the specific heat formula of
water to the specific heat formula of copper equal to each other to figure out
the specific heat (c) with E=mcΔT formula for both. Since the volume of
water was 150 ml, and the density of water is 1g/ml, its mass was 150 g, the
temperature change was 12.5ºC, and the specific heat is 4.18J/gºC. With the
copper, the mass was 39.5 g, and its temperature change was around 480ºC. When
we found our specific heat , all the other groups compared and averaged them all out. However we
found the actual measurement of specific heat wasn’t really close to our
results!
This week was pretty easy. I understood all of the concepts
and I really enjoyed doing the experiment with the copper. I learned that when
doing an experiment like this one it is essential to pay attention to the
directions and not to rush, if not it could skew the results and someone could
be injured due to carelessness. While I still don’t have a computer these
weekly blogs still help me remember the things I learned. Hopefully I will have
it back soon, but writing them down still does the job!
Saturday, January 5, 2013
Chem Blog Week 11
In this blog I will be talking about my experience of making my thermos!
We were assigned by Mr. Abud to make a thermos that would be able to hold a Styrofoam cup and to maintain the same temperature of water (or at least as close to the original temperature) as possible.
The Design

 When
planning out my thermos design I knew that it needed 1 thing: insulation. I
then looked up materials that would be the best to insulate liquids. The main
material was foam. I then looked up the construction methods of different types
of thermoses. The ideal design was a vacuumed container with a reflective
inside. I knew that I would have to make a vacuum but I didn’t know what to
use. I needed something that would be able to take out as much air form in
between the two containers as much as possible then my dad told me about
expanding foam. With expanding foam you are able to spray the substance where
you want it and then it will expand taking up all of the space in between. I
then used aluminum foil for the inside container. While it is metal, the
aluminum reflects not allowing energy escape the thermos. The containers I
started were tin cans but found out that metal was a conductor and would make the
water become cooler. I then found a different inner container but I wasn’t able
to find a big enough outer container so I used the can I already had. But what
I changed was that I “painted” the inside of the can with the spray foam to
make it better insulated. I also found shiny house insulation with bubble wrap
inside to wrap the inner and outer containers in before spraying the inside. I made
a cap for the thermos with a Styrofoam circle and aluminum foil putting a hole
for the thermometer. I then made a “hat” for my thermos for more lining with
the same insulation putting a small cut at the top for the thermometer. My motto was “when in doubt, spray foam”
during that time and it worked wonders!
When
planning out my thermos design I knew that it needed 1 thing: insulation. I
then looked up materials that would be the best to insulate liquids. The main
material was foam. I then looked up the construction methods of different types
of thermoses. The ideal design was a vacuumed container with a reflective
inside. I knew that I would have to make a vacuum but I didn’t know what to
use. I needed something that would be able to take out as much air form in
between the two containers as much as possible then my dad told me about
expanding foam. With expanding foam you are able to spray the substance where
you want it and then it will expand taking up all of the space in between. I
then used aluminum foil for the inside container. While it is metal, the
aluminum reflects not allowing energy escape the thermos. The containers I
started were tin cans but found out that metal was a conductor and would make the
water become cooler. I then found a different inner container but I wasn’t able
to find a big enough outer container so I used the can I already had. But what
I changed was that I “painted” the inside of the can with the spray foam to
make it better insulated. I also found shiny house insulation with bubble wrap
inside to wrap the inner and outer containers in before spraying the inside. I made
a cap for the thermos with a Styrofoam circle and aluminum foil putting a hole
for the thermometer. I then made a “hat” for my thermos for more lining with
the same insulation putting a small cut at the top for the thermometer. My motto was “when in doubt, spray foam”
during that time and it worked wonders!

 The day of the testing was a day to remember. Everyone came to class with their thermoses and no one's looked the same. But most to all of the thermoses had styrofoam and aluminum foil included in their designs. For testing, everyone had to heat up their water to 80 degrees celsius and then we poured in our styrofoam cups then place it in our thermoses. We checked the temperature of the water every minute writing down its changes in temperature. When I began, I made the mistake of not having a hole for the thermometer. This lead to me to putting a hole in the bottome of the cup and having to continually take te top on and off to check the temperature making the water lose more energy than it should. Thankfully Mr. Abud counted that day as a practice day so we could improve our thermos designs. What I changed is that the top of my thermos had a slit at the top to insert the thermos. The next day we tested out thermoses and my new designed while being a simple change worked out perfectly. I only lost about 3 degrees from my water and I got the highest percentage in my class!
 It was fun creating the thermos and I can't wait for our next project.
Saturday, December 8, 2012
Chem Blog Week 12
This week we learned about specific heat. Before, we learned
that heat is energy, while energy is just energy, and the amount of it dictates
what the temperature is. The difference between heat and specific heat,
specific heat is not the transfer of energy, heating is.
This week, we also reviewed the degree of hotness (temperature) and quantity of hotness (heat). I am still slightly confused about the topic but I am doing pretty well. I’m just afraid that I will have to pay a dollar! I know now that heat doesn't directly affect temperature which means that heat itself is just an account of the transferring of energy. In conclusion, heat is the means to the energy, the energy the cause, and the temperature the result.


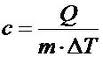
We were asked what the meaning of the
formula for specific heat is. While I did not know the exact meaning I knew what
the variables meant. In class, we learned that specific heat is the amount of
change that is required to change the temperature of 1 gram by 1ºC. I also
learned that specific heat=energy/(mass x Δ temperature), and specific
heat=Joules (J)/(grams x ºC).
With specific heat, the greater the mass, the greater the
amount of energy used to increase temperature change with a larger mass. When
we were working on the worksheet on this topic almost every problem was dealing
with water. It included the specific heat of it which is 4.18 j/g°c.

This graph
shows the Triple Point of water.
The triple point is the point where a substance
is in between all three states of matter. The substance would continually be changing into those states. Although it is possible with water it would take advanced technology to do so.
The triple point is the point where a substance
is in between all three states of matter. The substance would continually be changing into those states. Although it is possible with water it would take advanced technology to do so.
My predictions for next week are that we will learn more
about specific heat and I will get an even greater understanding of the
concept. I feel pretty secure on what we are learning and hopefully it will
stay that way. I’m actually writing my blog on paper because I haven’t had a computer
for moment. Hopefully I will have next week, but if not my blogs and my
presentation are going to be really late. L
Sunday, November 18, 2012
Chem Blog Week 10


Before, I would confuse the three and said that they were the same thing. However, heat is the transferring of energy, while, the energy itself is just energy. Think of an Mp3 being energy and the iPod, computer, or CD being heat; it is just a different way the energy is stored but it is still the same energy.(More about that below!)
I also learned about how two substances of different temperatures affect the overall temperature and the amount of heat when they are separately put into two containers of the same liquid at the same temperature. We did an experiment to find what would make a greater effect on the water overall: the hotter water with a smaller amount or the warm water with more water in that container. We found that the cup with more water in it, while being not as hot affected the temperature more that the other water. So the degree of hotness (temperature) depends on the speed of the particles and not the number of particles. The larger cup’s particle lacked in speed, but had greater mass. So mass and speed determined its greater energy input. While it took some people a while to understand what we had just learned, it came to me pretty easily (Once again,thanks Eureka!). It taught, along with Mr. Abud that the degree of hotness=temperature. The quantity of hotness=energy(heat).


But, energy is not tangible. You can’t touch it or measure its mass on a balance. However, it can be transferred as well as stored. In Physics last year we were taught about different types of energy (kinetic, elastic, ect.) and that it would change. But like the example I was talking about earlier, just like music, even if energy moved in different ways, energy still remains the same. It doesn't change. Therefore, the quantity of energy can be changed, but the degree energy cannot be changed.On Friday Mr. Abud was not but we were able to communicate with him on someone’s iPad. He told us to work on a worksheet that dealed with boiling points and sumblimation. I am not very sure about that worksheet but hopefully we will talk more about it on Monday.
 Our thermoses are
due on Monday and thankfully I didn’t leave to the last second because that
would have been a nightmare! I am just putting on the finishing pieces.
Hopefully it works well because I worked really hard on it. This week has been
pretty stressful because I was gone on Friday and since the holiday is coming
the week is even more busier than usual. But I’m getting through this weekend
slowly but surely!
Our thermoses are
due on Monday and thankfully I didn’t leave to the last second because that
would have been a nightmare! I am just putting on the finishing pieces.
Hopefully it works well because I worked really hard on it. This week has been
pretty stressful because I was gone on Friday and since the holiday is coming
the week is even more busier than usual. But I’m getting through this weekend
slowly but surely!Saturday, November 17, 2012
Chem Blog Week 9

We previously learned that a barometer measures atmospheric pressure. During the past weekend we were told to make one out of household materials. I used the more common model, (a jar with a balloon on top and a straw) but I made it to work efficiently by including a guide and a stand for the barometer. Mr. Abud really liked mine and he did so much that he tweeted it!

This week, I also learned how to do mathematical problems involving temperature, volume, number of particles, and pressure. I learned that the secret to do these problems is to keep in mind that when you are trying to find the change of one of the factors, you have to make that you keep them proportionately related to each other. I am a little bit shaky on this but hopefully I should be able to understand it next week.

Sunday, November 4, 2012
Chem Blog Week 8
While this week was stressful, I had a bunch of fun in
#ChemT3am!


 When we were reviewing our previous labs, Mr. Abud gave us a
challenge to find the point of temperature where there would be absolutely zero movement in particles. We
came up with a very close temperature to the actually temperature of -273.15°c. We
were then told that this temperature is called Absolute Zero. This is the point when there is no movement with
particles and it is measured in Kelvins.
When we were reviewing our previous labs, Mr. Abud gave us a
challenge to find the point of temperature where there would be absolutely zero movement in particles. We
came up with a very close temperature to the actually temperature of -273.15°c. We
were then told that this temperature is called Absolute Zero. This is the point when there is no movement with
particles and it is measured in Kelvins.
This past week was a very busy one because it was the last
week of the quarter. But chemistry was the only class I was not losing sleep
about. When I am class I learn so much and since we don’t receive homework I am
able to have the information settle in my brain instead of it spewing out on a
worksheet. Even with the experiment given, I was able to finish it within an
hour and it only took that long because I was making it “fancy”.
Subscribe to:
Posts (Atom)